A friend suggested I write a guide about live notetaking in LaTeX, since it’s pretty useful and something I have a fair amount of experience with. I had been making attempts at live-LaTeXing course notes for a year or two before I was able to make it through a semester long class; the first course I fully LaTeX’d was Vojkan Jaksic’s excellent Analysis 3 (introduction to metric spaces and topology)PDF. Not my best work, but it did the job.
. Most recently, I wrote notes for Sergey Norin’s Combinatorics course which I submitted as a project for the classPDF, source. Probably my best work.
.
Objective
If you are interested in this sort of thing, as with anything, you need to identify your goal. With the Analysis 3 notes, my goal was to learn how to LaTeX quickly, to replace my paper notebook with a PDF I could search, and to be able to share my notes easily with classmates.
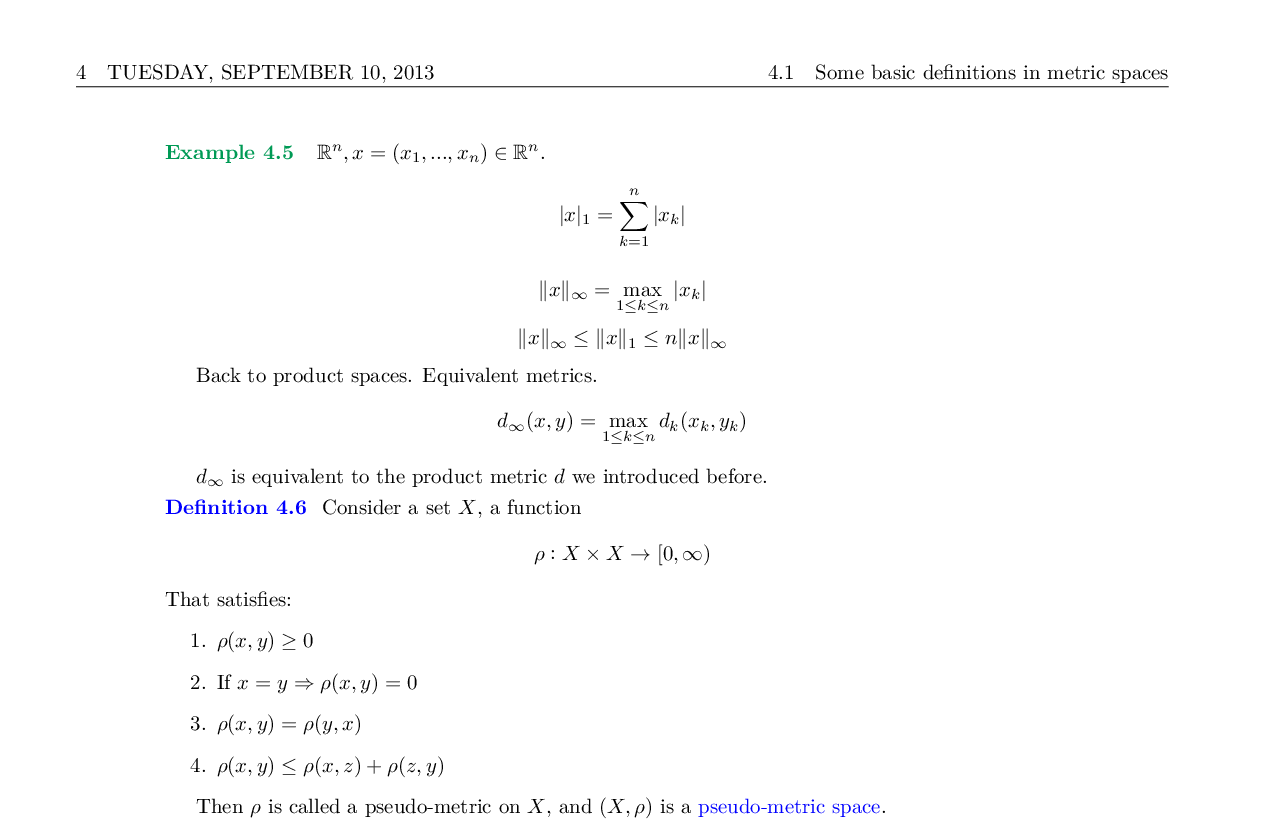
The top half of page 15 of my Analysis 3 notes. I used dates for section titles because that’s how I organised my paper notes. I didn’t write in full sentences, and the equations and words don’t always flow nicely.
With the Combinatorics notes, my goal was a little different; my research directions so far have led me to analysis and linear algebra, with just a little bit of combinatoricsMy work on Landauer’s principle last summer used a simple combinatorical argument to prove part of an adiabatic theorem.
. Since I figured I wouldn’t be working with combinatorics frequently, I wanted a reference to be able to remember what I learned if it comes up down the line. Once Prof. Norin mentioned I could use the notes as my class project, I felt justified spending a lot of time on it, too.
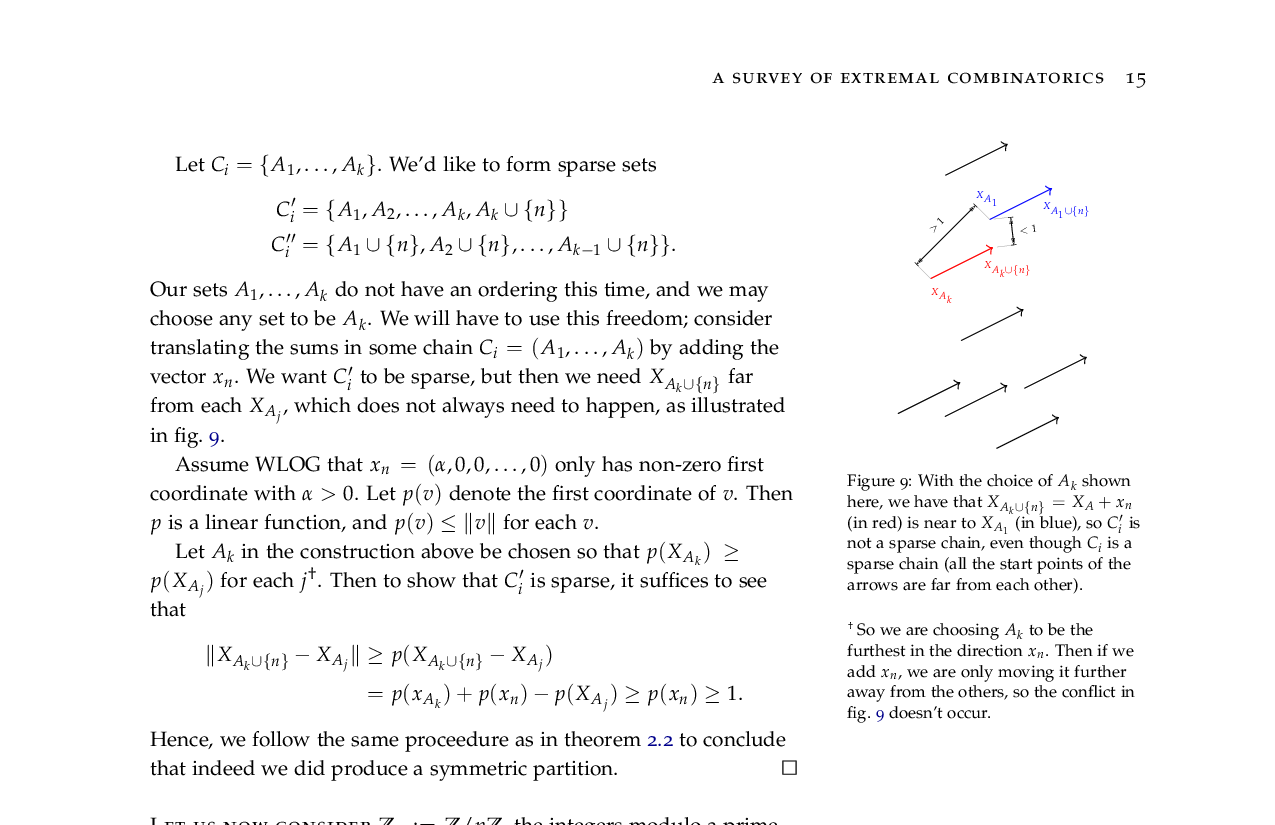
The top half of page 15 of my Combinatorics notes. Written much more carefully, with full sentences and figures in the margin.
In this post, I’m going to assume our goals are that of the first case: to create workable LaTeX notes without a huge time investment. This is the first step for the second case anyway; polished notes come from rough notes and polish.
Methods
The idea is to walk into the classroom, open your laptop, and get down most of the things written on the board and the important things spoken by the professorI find if the professor goes into a spoken tangent with little blackboard writing, it’s easier to just listen and possibly write a brief summary than try to get it all down. It’s usually more for flavor anyway. I do think it helps to get more than just strictly what was written, however.
. For this to happen, you’ll want
- Working LaTeX distribution and editor,
- A .tex file with the title/date/etc filled so you can just start writing the content,For something to get started, here is a template I’ve assembled for notes, inspired by Jack Sankey’s casual tablet-written notes.
- and maybe a snack or something, lectures can feel long.
The point being, I’ve found it most overwhelming when I’m trying to create a folder for the class and then make a .tex file and then find my LaTeX distribution is buggy just as the class is starting.
In order to keep up with the pace of writing, I think an iterated strategy of optimisation is important. The first class, just try to get everything downAnd there’s no shame in switching back to paper to get what you need.
. After class, besides getting the document compiling (I try to compile as I go, but if you can’t find the error, gotta keep moving), the important thing is to figure out what took the most time in class, and to minimise those times. Possible fixes:
- Create LaTeX commands in the document (remembering to aim for semantic commands over syntactic). These can be general-use commands like
\newcommand{\reals}{\mathbb{R}}to create the symbol \(\mathbb{R}\) just by typing\reals, but also document-specific commands. For example, if we were using the notation \(\sigma^{(1)}\) for the Pauli-\(x\) matrix, I’d put\newcommand{\paulix}{\sigma^{(1)}}in the preamble, or something like that. The idea being that while it’s not much shorter,\paulixis quicker to type and is easy to rememberAnd, as usual for a semantic command, if you decide to change to a different notation for the matrix, you only need to change the command in the preamble.
. One command I have in basically every document I write is\newcomand{\inv}{^{-1}}to write inverses. I love this command: it’s semantic, it’s quick to type, and it replacesshift+6, shift+[, -, 1, shift+](all of which are far from the middle row of the keyboard!) with\, i, n, v. Use features in your LaTeX editor. For example, with Sublime Text and the LateXTools package, with the help of a “snippet”, typing
al + tabyields
with the cursor blinking happily in between the two linesIf you want, my sublime snippets (copied directly from my Sublime configuration folder at the time of this writing) can be found here. I’d encourage looking at them to get an idea, but I think this kind of thing is pretty personal and what works for one person won’t for another.\begin{align*} \end{align*}
.- Use key bindings to speed up moving around the document. Inspired by
vim, I boundctrl+jto move the cursor one space to the left,ctrl+l, right,ctrl+ifor up,ctrl+kfor down. That way, my hand doesn’t need to leave the keyboard in order to move the cursor around to correct a mistake. Expanding this, I usectrl+hfor jump to the beginning of the line, andctrl+;for jumping to the end of the line, and combinations likeshift+ctrl+jfor select one space to the left, etc. This all sounds kind of complicated, but is extremely useful, and makes me feel like I can fly around the documentMy keybindings for SublimeText are here (OSX) or here (Windows). I actually use the colemak keyboard layout, so I had to translate those to qwerty. If you happen to use colemak too, then see here (OSX) or here (Windows) for the layouts.
. I also remap the capslock key to backspace, which I think is pretty convenient.
Then go take some more notes! By steadily tweaking things and getting more practice, it can go from “lots of suffering” to “easier than handwriting”.
It’s a fairly individual process, one that I see as a way of making your computer work for you. See below for more references and information about specific editors, keybindings, and tools.
Appendix: Specific tools and references
I use Sublime Text 3 with LaTexTools; there is good documentation on the linked LaTeXTools Github page. I also use the package Automatic Backups.
Sublime Text is customised by files in its User folder, which lives in Data/Packages/User. But where is Data? That depends on the OS; in Windows, it’s in %APPDATA%\Sublime Text 3, in Mac OS, it’s in ~/Library/Application Support/Sublime Text 3 and in Linux, ~/.config/sublime-text-3. More documentation can be found here.
Rebinding capslock to backspace
Windows: I use the program KeyTweak, which applies registry remappings. I think the author took down the website, and I can only find it on sketchy wares sites at the moment. However, I put the installer here, if you’re willing to run an executable from a random blog. The .exe has an embedded manual which includes a license permitting this distribution, which is included as a text file in the zip fileThis inclusion being a requirement for distribution.
.
Mac OS: I use the in-development program Karabiner (download dmg). Installing from the dmg is straightforward, but to actually remap capslock to backspace, one needs to create a ~/.karabiner.d/configuration/karabiner.json file with contents
{
    "profiles": [
        {
            "name": "Default profile",
            "selected": true,
            "simple_modifications": {
                "caps_lock": "delete"
            }
        }
    ]
}
as described here. To have the program start automatically, go to System Preferences, then Users & Groups, and add it to the login items.